The Ultimate Mission Maker is designed to overcome the horrors of the Ingress Mission Authoring Tool from Niantic.

By creating the banner using the UMM combined with IITC, the submit of a new banner in the mission tool will extremely simplified.

IITC
How to use the plugin

Instructions on how to use the plugin

Read more »

Banners
How to create a banner

Draw missions using the plugin

Read more »

Missions
How to create missions

How to create Ingress missions

Read more »

Download UMM v0.7.3
Note: Uninstall Beta version before installing this version

Basics of Ultimate Mission Maker

What is Ultimate Mission Maker?

The Ultimate Mission Maker (UMM) is an IITC plugin to streamline the (banner) mission creation process. It allows you to design your mission in IITC, export it as a JSON file, import that into Niantic's Mission Maker and have it pre-fill everything for you. No longer will you have to use the horrible map that groups portals together. All portals will be loaded automatically from your JSON.

Process in a nutshell:

1. Design your (banner)mission in IITC (more info on that below)
2. Export as JSON through UMM Opt
3. Go to Niantics's mission maker
4. At the top, there will be a new UMM button
5. Load your JSON file into Niantic's mission maker
5. Click on "New mission"
6. When it prompts you for a title, select which mission of your banner you want to load at the top
7. Press Import, the mission title and description will now be pre-filled. Add the image, click next
8. Check the portals on the map, NOTE: currently everything is loaded as HACK. You can change that here
9. Once you're happy, click next and finalize your mission.

For support join the (cross-faction) Telegram Group

Using IITC & UMM

The Ultimate Mission Maker (UMM) will add a series of buttons to your canvas and create a menu option.
 

Intel Map Canvas

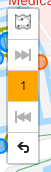
From top to bottom the canvas buttons are:
a) Toggle Mission Mode: turn UMM on / off.
b) Next Mission: Go to the next mission.
c) Active Mission: Indicates the active mission and switch between missions.
d) Previous Mission: Go to previous mission.
e)Undo: Remove last portal from the mission.

Canvas

The IITC Menu

The UMM Opt link will open the UMM Option Screen

Menu

UMM Option Screen

Canvas

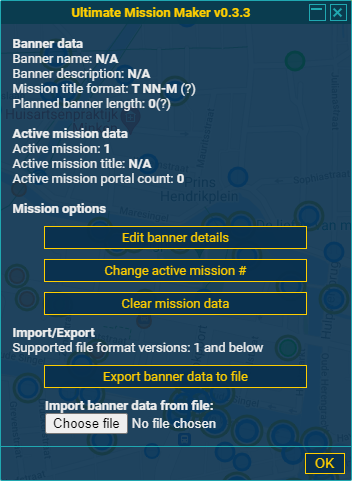
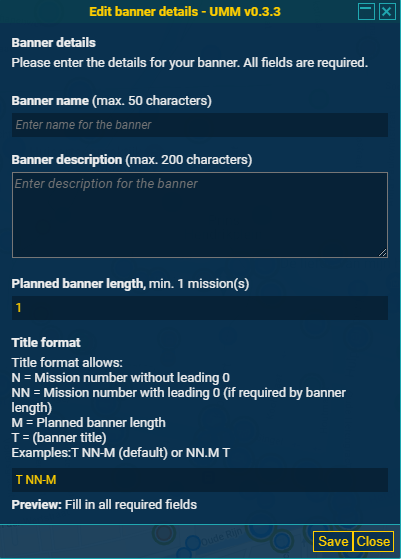
This screen shows all current settings for a banner and users can:
1) Open the edit screen (see create a new banner).
2) Change active mission number, same as canvas button (c).
3) Clear all mission data: current banner data will be wiped.
4) Export mission data: a json file, containing the complete banner data, will be downloaded.
5) Import settings from file: import a json file.

Processing a banner

Create a new banner

The Toggle Mission Mode (a) button will start the creation of a new banner by showing this screen.

On this screen the user can add mission set name, mission set description, planned banner length and title format. The name and format will create the names of the individual missions in the mission authoring tool.

Click Save and click the first portal of mission 1. When mission 1 is done, the user can click Next Mission (b) from the canvas and the plugin will start creating mission 2, etc. etc. See demo video below.

Edit banner settings

Modifying an existing banner

Users can modify the current banner or load a data file form disk and edit that.

All settings (name, description, length and title format) can be changed on the Edit banner details screen (see: create new banner).

The user can also modify individual mission routes by removing portals using the Undo button on the canvas (e). When all portals are removed from the last mission, the user can Undo once more to undo the complete mission and switch to the mission before.

Ex- or importing a banner

When the user created the complete banner (or wants to save the current progress to disk) simply click the Export banner data as file button on the UMM Opt screen.

Users can also load a file from disk using the Choose file button on the same screen. When the file format of the imported file is not compliant with the current version of the UMM, the data will be converted. This could mean that the user must add addition data using the Edit banner details screen.

Mission authoring tool

On the Mission Authoring page load the data file using the white folder icon on the top.

Then click the Create New Mission button and choose the type of mission you want to create.

On the next screen click the Import button on the top and all data will be imported. Upload a picture and click Choose Waypoints.

On the next screen the user can accept the portals or add actions / pass phrases.

Click Preview Mission followed by Submit.
Then repeat for every mission in the banner and wait for the approval by Niantic.

Credits

Credits to Vashiru for allmost all of the coding, DanielOnDiordna for the support and j00rtje for hunting Vashiru.